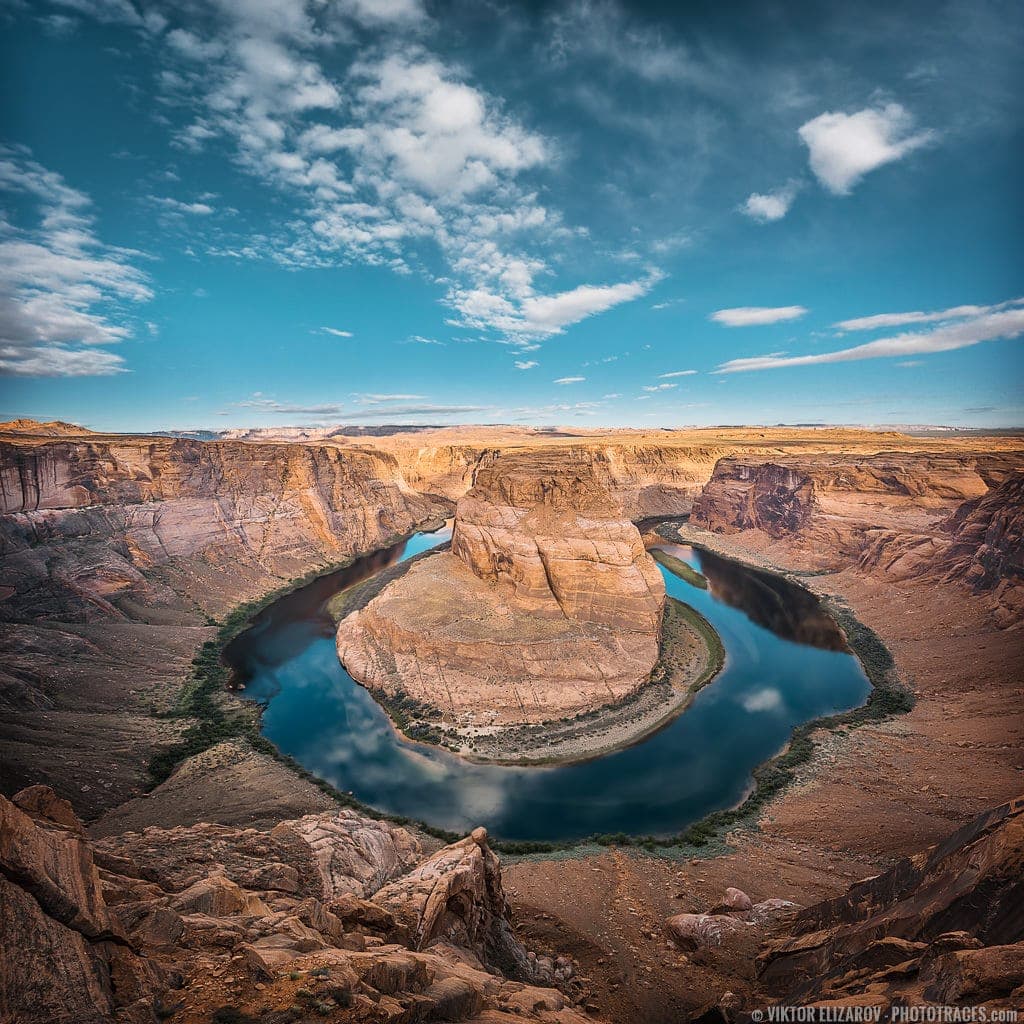
Horseshoe Bend is one of those must-see locations that eluded me for a couple of years.

A few years ago while driving from the Grand Canyon, I was only 30km from the Bend when I faced a road closure caused by a landslide. I was forced to take a detour, which meant there was no chance of making it to Horseshoe Bend before sunset.
Last year, I had better luck and finally made it to the Bend but it was raining and dark. I had to wait for half an hour before the rain stopped and, even then, the weather was still less than favorable. I only managed to take a couple of decent shots.
This year, I finally stayed in Page, Arizona for a few days and had plenty of time to visit Horseshoe Bend on multiple occasions.
The Challenges of Photographing Horseshoe Bend
Challenge 1
The main challenge is that Horseshoe Bend is always crowded.
As an easily accessible spot located only a few kilometers from the bustling tourist town of Page, Horseshoe Bend is an easy 10-minute hike from the parking lot and has become a well-known attraction for locals and travelers.
When I first visited the location during the rain, I was pretty much alone and assumed this would always be the case for future visits. I was wrong.
Related: Landscapes & Seascapes of Grand Manan Island
This year, I approached Horseshoe Bend about an hour before sunset and anticipated epic photos only to find myself among 500 or so people walking towards the Bend. It felt weird and uncomfortably crowded. After driving through the dirt roads of Arizona and Utah where I hardly saw anyone else for nearly three days, I was immersed in an environment as busy as Times Square. I didn’t like it, to say the least.
I turned around and left.
I visited the Bend the following morning to take a featured photo and, while it was still busy, it wasn’t as busy as the night before. I was at least able to walk around until I found the perfect spot.
Challenge 2
It’s not easy to photograph Horseshoe Bend because of its vastness. Even with an ultra-wide 10mm lens, it’s impossible to fit all the elements of the scene in the photo to create a decent composition.
Related: Big Sur Road Trip in California
Also, you don’t have the option of stepping back for a wider perspective because the edges of the cliffs hang over the Colorado River. Even if you manage to find the perfect spot at the very edge, you still have to lean forward to frame the area around the river. This is the reason why most of the photos of Horseshoe Bend look extremely similar.
To overcome this challenge, I used the vertical panorama technique.
Shooting
My plan was not to think about the composition but instead to shoot as wide as possible and to collect as much information from the scene as possible, and decide later how I wanted to crop it.
Related: Top Arizona Landscapes
I used the vertical panorama technique, where I shot 3 shots starting from the top, hand-held. I locked the exposure before taking the first shot and kept shooting.


- Camera: Sony a6000
- Lens: Sony-10-18
- Focal Length: 10mm
- Shooting Mode: Aperture Priority (A)
- ISO: 250
- Aperture: F/6.3
- Shutter: 1/125s
- Bracketing: single shot
- Tripod: hand-held
Processing
I used the Photo Merge Panorama module in Lightroom which was introduced in version 6. I used the following settings:
I used the following settings:

Next, I used Boundry Warp feature, the one which was introduced recently in Lightroom CC.

Next, I had to make a decision about the composition. I decided that square cropping would be most appropriate here and I used the Crop Tool in Lightroom to make the horizon straight and to crop it 1×1 aspect ratio.

The process of editing was more complex than usual.
I started with Lightroom Rapid Editing, using the Dreamy preset from my HDR Photography collection as the starting point. But later I used many manual tweaks and adjustments to achieve the look I wanted.
Below are the final Lightroom edits:

Photoshop: color correction, contrast, cleaning.
Photoshop Plugins:
- Topaz DeNoise was used to reduce digital noise (sky).
- Topaz Clarity was used to enhance details and boost colors (foreground, mountains).