Foreground, Middleground and Background are essential elements that breathe life into your scenic captures. In the world of landscape photography, understanding how to harness these three layers can make the difference between a visually compelling image and a flat, uninspiring one.

This article delves into the art of utilizing the foreground, middleground, and background to craft captivating compositions that transport viewers into the heart of your landscapes.
Table of Contents
How Foreground, Middleground Background Concept Works
In landscape photography, the interplay of the foreground, middleground, and background is nothing short of an art form. These three elements are the cornerstone of crafting a composition that is not just visually appealing but also rich in depth and dimension.
While photography itself is a two-dimensional medium, the most captivating images are far from “flat.” Instead, they possess a three-dimensional quality that draws viewers into the scene, making them feel as though they could step right into the photograph.
This illusion of depth is artfully achieved by skillfully positioning elements of interest in the foreground, middleground, and background of the frame. This concept of creating depth through these layers is not exclusive to photography; it has its roots in the Renaissance period, when painters first harnessed it to bring their artworks to life.
In practical terms, consider the foreground as the gateway to your composition. It serves as the initial point of engagement for viewers, drawing them into the scene. It might include elements like rocks, flowers, or a glistening stream, each playing a role in setting the stage for the story your photograph tells.
Moving to the middleground, you continue to build the narrative. Here, elements like rolling hills, a quaint village, or a lush forest begin to unfold, adding substance to your image and providing context for the viewer.
The background is where the scene culminates, and it often features the grand spectacle that inspired you to capture this landscape. It could be a mountain range, a tranquil lake, or a vast, sweeping sky. Placed in the background, these elements not only anchor your composition but also convey the scale and sense of place that are essential in landscape photography.
Understanding the pivotal role of the foreground, middleground, and background empowers you to craft compositions that are aesthetically pleasing and deeply immersive. It’s a technique that elevates your landscapes, giving them a profound sense of scale, and inviting viewers to step into the frame and become part of the story you’ve masterfully captured.
Beyond the Golden Ratio and the Rule of Thirds
In our previous articles, we thoroughly explored the concepts of the Golden Ratio and the Rule of Thirds, two influential composition techniques that view the image as a grid of intersecting horizontal and vertical lines. These principles have proven to be invaluable in achieving balanced and aesthetically pleasing compositions across various genres of photography, from captivating portraits to alluring product shots.
However, when it comes to the vast landscapes that unfold before us, we seek more than just classical principles; we aim to convey a profound sense of depth and scale. This is where the Rule of Thirds and the Golden Ratio may fall short.
To truly capture the depth and grandeur of a sweeping landscape, we must shift our focus to identifying and enhancing its natural layers: the foreground, middleground, and background.

Loc: 35.378528, -120.862712
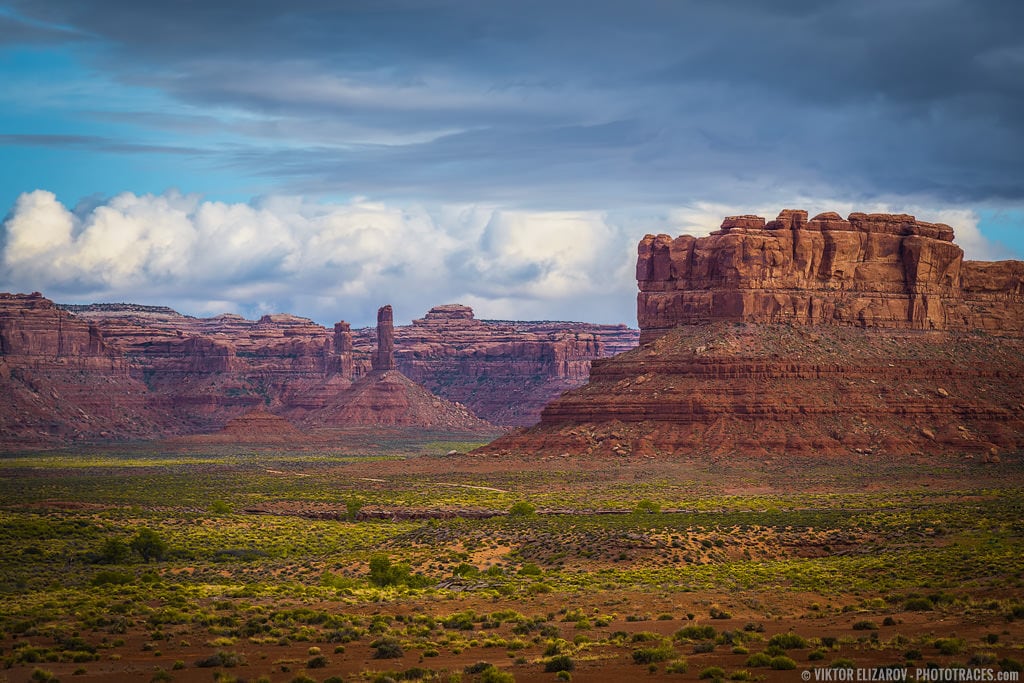
Foreground, Middleground Background: Example #1
Let’s examine the image captured in the Valley of the Gods in Utah, where the composition unveils an array of distinct layers.
As we analyze the photograph, our focus is immediately drawn to the central object of interest – a prominent rock formation on the right side. Deliberately positioned in the middleground, it acts as the focal point, inviting us to explore its details.
Multiple rock formations in the background have subdued colors, further enhancing the sense of distance.
In the foreground, a palette of yellowish-green tones provides both equilibrium and warmth to the entire frame.
This composition is a example of combining the Rule of Thirds with the concept of depth in landscape photography. The primary object of interest is placed off-center, at the intersections of two horizontal and one vertical line, in harmony with the principles of the Rule of Thirds.
The result is a photograph that captivates the eye and transports the viewer into the heart of the Valley of the Gods.
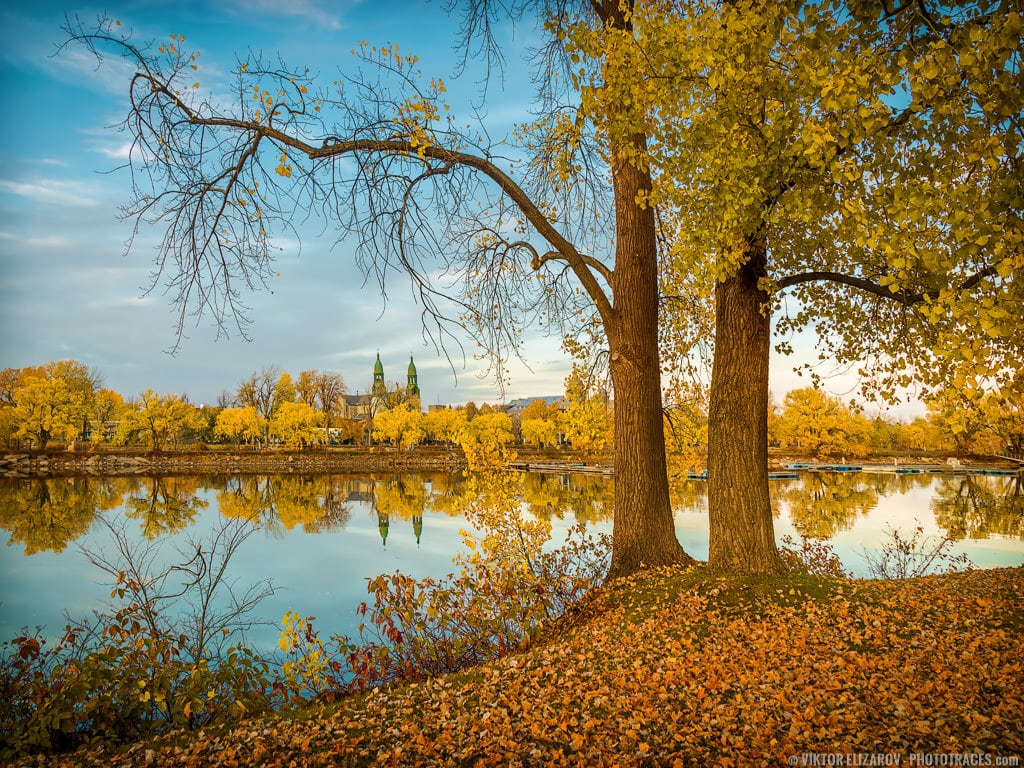
Foreground, Middleground Background: Example #2
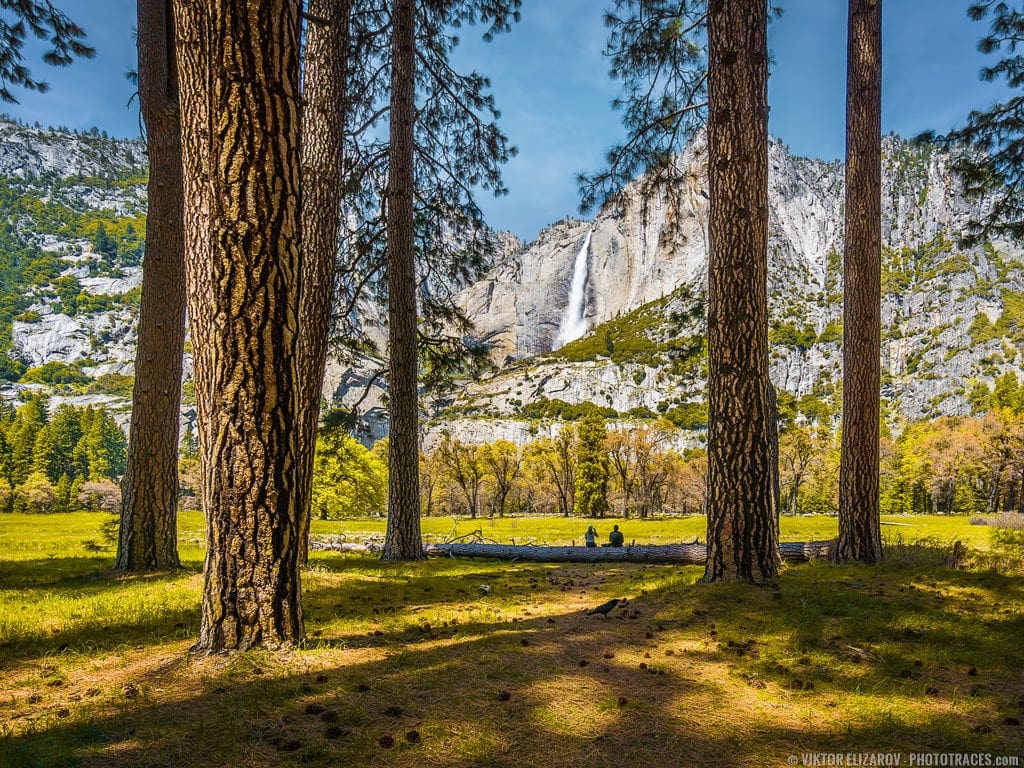
The photograph below combines the Phi-Grid (Golden Ratio) with the concept of depth.
In this composition, the church, one of the objects of interest, is positioned closer to the center, occupying the narrower horizontal middle section as typical of the phi-grid, alongside a line of trees forming the background.
To enhance contrast and depth, a strong foreground is created with two trees aligned along a vertical axis, naturally framing the background object of interest, the church.
The serene, reflective lake adds to the composition, with reflections that contrast with the water’s color. Serving as a middleground, the lake effectively unifies the entire composition, integrating the foreground and background elements.
Foreground, Middleground Background: Example #3
Here’s another example that illustrates how I apply the concept of foreground, middleground, and background technique to create a layered composition within an expansive seascape.
This particular location is one of my favorites in California – it’s Montaña de Oro State Park, situated not far from Morro Bay. The park is renowned for two things: its extensive and distinctive dune area and providing the best vantage point to view the volcanic plug known as Morro Rock.
- In this composition, I strategically positioned the dunes as the primary focal point in the foreground.
- In the background, you’ll find the central element of the entire image: the imposing Morro Rock.
- Finally, the Pacific coastline, with its mesmerizing surf patterns, serves as the connecting element between these two key components, forming the middleground.
Collectively, this arrangement conveys the vast expanse and depth of this magnificent seascape.

Loc: 35.2974, -120.8688
Foreground, Middleground and Background in Landscape Photography
Add An object of Interest in All Three Areas
Incorporating captivating elements into all three areas of your composition is an ideal approach. Placing objects of interest near the intersections of horizontal and vertical lines, whether in alignment with the Rule of Thirds or the Golden Ratio, can result in a well-balanced composition.
While it’s not always possible to include compelling subjects in all three areas, having strong focal points in two areas can still create a landscape image with a profound sense of scale and depth.
The two most frequently emphasized areas are typically the background and the foreground or the background and the middleground. This selective approach can effectively convey the desired depth and perspective.
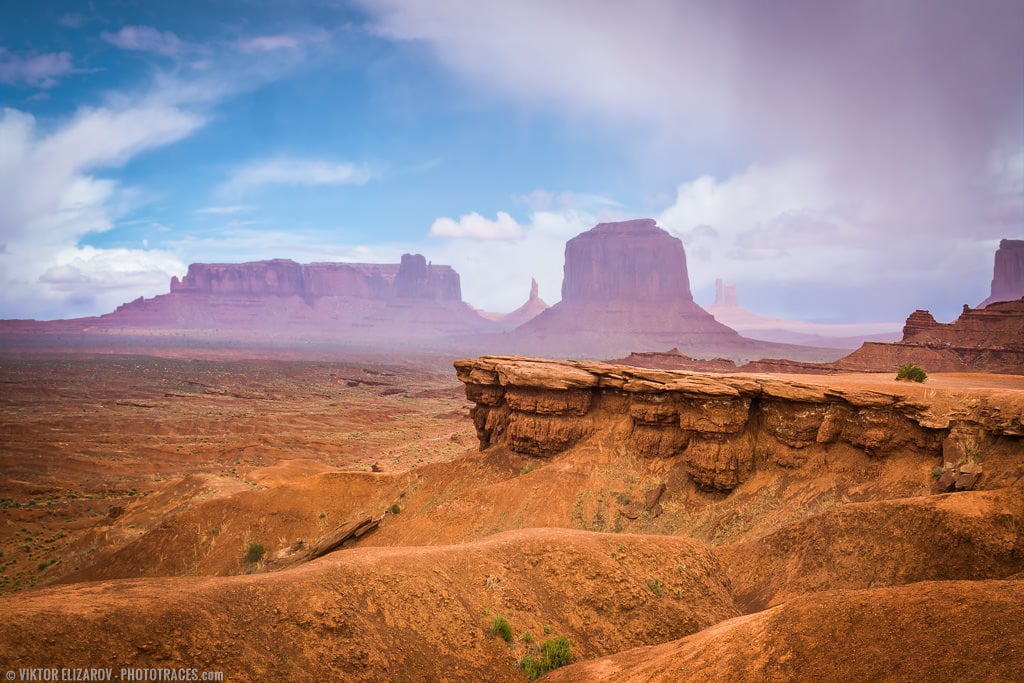
For example, consider the photograph of John Ford’s Point in Monument Valley. Although there are no distinct objects of interest in the middleground, the image convincingly conveys a considerable expanse between the prominent rock formation in the foreground and the distant mountains in the background.
This illustrates the capacity of a well-balanced composition to evoke a sense of depth and scale, even with focal points in just two areas.
Use Leading Lines to Unite Foreground, Middleground and Background
Using leading lines is a powerful technique to enhance the perception of scale and depth within landscapes. These lines, whether they occur naturally or are manmade, include elements such as rivers or roads that guide the viewer’s eye into the image, ultimately leading them to the focal point of interest.
Leading lines can also serve as a unifying force, seamlessly connecting the foreground, middleground, and background.
See also: Portrait vs Landscape: 5 Main Differences
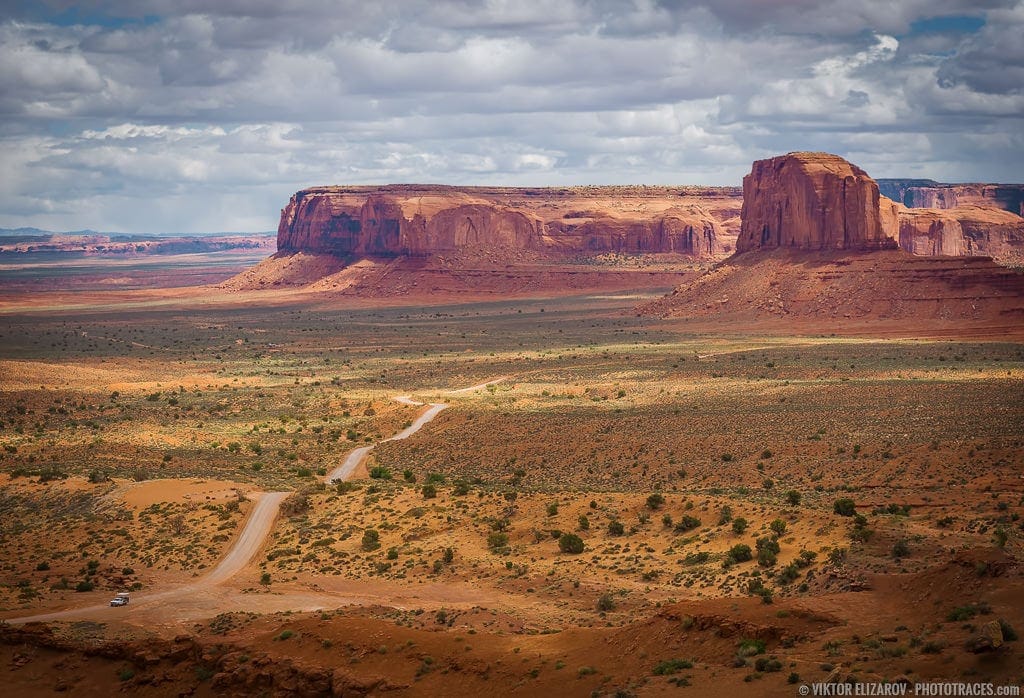
Take, for example, the photograph below, offering another perspective of Monument Valley. Here, I employed the winding road as a prominent leading line that commences in the foreground and directs the viewer’s gaze straight toward the impressive rock formations in the background.
This strategic use of leading lines achieves two essential aspects in the composition.
- Firstly, it conveys an undeniable sense of distance, emphasizing the vast expanse of the scene.
- Secondly, it provides a clear understanding of scale by including a truck on the road, offering viewers a valuable reference point to comprehend the grandeur of the landscape.
Maximize Depth of Field
In landscape photography, the quest for optimal sharpness throughout the entire frame, from the foreground to the distant background, is paramount. To accomplish this, a technique that comes into play is closing the aperture, which involves selecting a higher f-number, typically starting from f/8 and beyond.
As a consequence of this adjustment, a slower shutter speed becomes a necessity, but this poses no challenge when your camera is securely mounted on a tripod.
To truly master the art of maximizing depth of field, delving into the concept of Hyperfocal Distance is well worth your time. Hyperfocal distance is the precise point to which you focus your lens to achieve the utmost depth of field in your images.
If you’re keen to dive into the nuances of depth of field, you can access my comprehensive tutorial on Hyperfocal Distance here: “Hyperfocal Distance In-Depth.”
Foreground, Middleground and Background | Conclusion
Do you ever wonder if it’s feasible to incorporate the Rule of Thirds, compelling elements in each area of the foreground, middleground, and background, along with effective leading lines, all within one photograph? The answer is a resounding “yes.”
To master this art, follow this simple 3-step framework to infuse your landscape photos with a profound sense of scale and depth:
- Step #1 Identify objects of interest in at least two of the three areas – foreground, middleground, and background.
- Step #2 Arrange these elements, guided by the principles of the Rule of Thirds or the Golden Ratio, to achieve a balanced composition.
- Step #3 Align the scene’s leading lines (natural or manmade) with the rest of the composition.
These skills can’t be learned overnight, but if you go out and shoot as much as possible, they’ll become second nature.
(Also, check The Composition Checklist for Landscapes).
The portfolios of your favorite landscape photographers (or even painters!) will also help you immensely. Don’t be afraid to steal an idea or two. Everyone did it before they coined their style.