If you want to learn how to UNDO in Lightroom, then you’ve come to the right place.
The “undo” and “redo” commands are probably the most common and most used commands in any computer program. These commands make life a lot easier for users because they allow us to jump a few steps back to correct our mistakes.
For a long time, the “undo” functionality was nonexistent or extremely limited in graphics applications. Computer processing was simply not powerful enough to handle such a command in the workload.
I remember when Photoshop had only one “undo” step. This made every error costly because I could only undo my last editing step. To minimize those costly mistakes and to save time, I used the Save As command to create intermediate versions of my project. By the end of the process, I had anywhere between 10 to 20 saved breadcrumb versions.
See also: How to Apply a Preset to Multiple Photos in Lightroom
When Photoshop introduced its multiple “undo” command, it was still limited. The number of steps you could go back was determined by how much RAM you allocated to Photoshop since it kept history steps in its memory.
How to Undo in Lightroom
Lightroom is a unique program in regard to keeping track of all the editing steps. It allows us to use unlimited “undo” commands regardless of how powerful your computer is or how much RAM you have.
What makes this possible is the concept of nondestructive editing that Lightroom uses as the foundation of its RAW processing.
Nondestructive editing means that when you edit a photo in Lightroom, the program does not modify the original image. It only creates a JPEG preview for every editing step that you perfect. The program stores the editing instructions in a sidecar text file if you use the RAW format or inside the image’s metadata if you use the DNG format.
Related: Free Lightroom Travel Presets
This approach allows us to have an unlimited number of editing entries inside the text file without a substantial increase in the file size. What is even more amazing is that you can jump to any point in your processing workflow without taxing the program or your computer.
Lightroom gives us a number of different ways to use the “undo” functionality.
01. History Panel
The History Panel is the visual representation or roster of every editing step performed in Lightroom.
You can find the History Panel on the left side of the Develop Module.
In the History Panel, you will find the editing steps you performed on your images as well as the changes in values.
Related: How to Transfer Lightroom to Another Computer
When I see the entry “Vibrance +46 57,” this tells me that I boosted the Vibrance value by 46 with the final value set to 57.
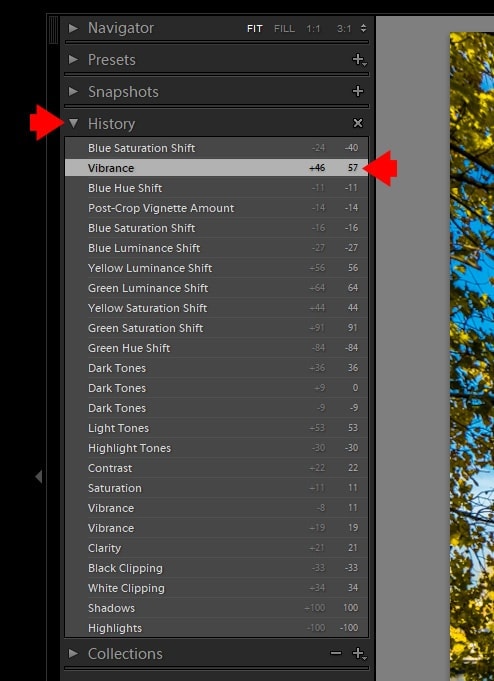
You can jump to any point in the History Panel by clicking the corresponding entry.
If you jump back, let’s say by 10 steps, and adjust the Exposure, Lightroom will create a new entry in the History Panel and delete the 10 editing entries that correspond to your previous editing steps.
Related: How to Copy and Paste Edits in Lightroom
This is where the Snapshot Panel, which is a sidekick to the History Panel, comes into play.
02. Snapshot Panel
At any time in your editing process, you can save an instance of the History Panel as a Snapshot.
The saved instances are saved in the Snapshot Panel located above the History Panel.
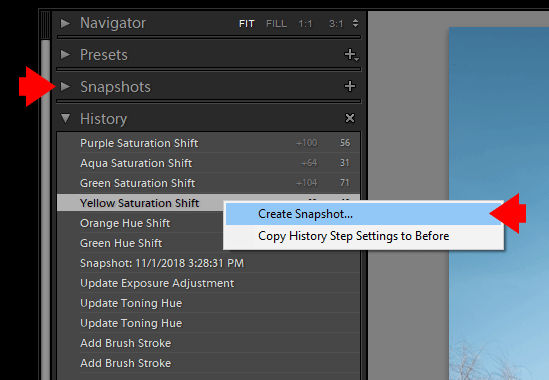
I use the Snapshot Panel extensively, especially when I use the Rapid Editing workflow.
Related: How to Add Vignetting in Lightroom and Photoshop
For example, I used the Natural Preset from the Landscape Collection. Next, I used the Adjustment Presets from the TOOLKIT to finetune the image. Once I was happy with the final look, I created a Snapshot and named it “Rapid Editing Formula, Natural (9, 17, 21, 32).” Then, I reset all my edits and tried to come up with a different editing variation of the same image. Once I was happy with the next look, I saved it as a new Snapshot.
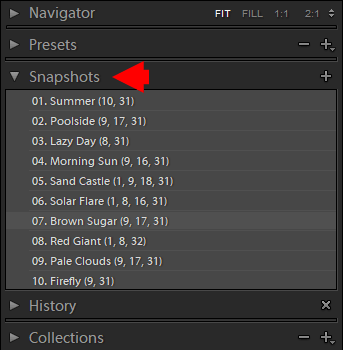
By the end of my editing workflow, I have multiple editing variations saved as Snapshots.
03. Undo and Redo
You can also use keyboard shortcuts “Ctrl + Z” (“Cmd + Z” on Mac) to undo your previous editing steps. You can use “Ctrl + Y” (“Cmd + Y” on Mac) to redo the steps.
“Undo” commands work slightly different than the History Panel.
The History Panel is restricted to only the selected image while the “undo” command works across the entire application.
Let me explain.
For example, if you switch the module during the editing process, the “undo” shortcut command will take you back from one module to another. If you start with one image and then select another, the “undo” shortcut command will undo the image switch as well.
Related: Take Quiz: Find Lightroom Replacement
In my case, I only use the “undo” shortcut command to jump back one step. If I need to go back further, I use the History Panel.
04. Reset Command
At any point in your editing workflow, you can reset the image to its original state.
You can do this by hitting the Reset Button on the bottom right corner of the Develop Module. Alternatively, you can use the keyboard shortcut – Ctrl + Shift + R – to trigger the reset from any module.
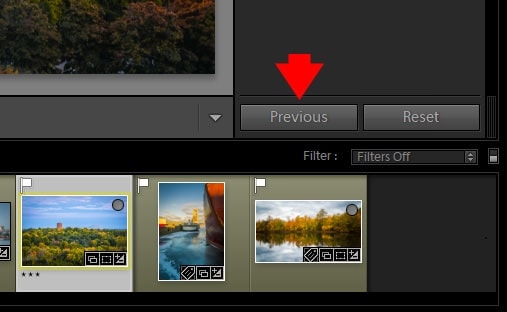
The reset command undoes everything—all the editing effects, local adjustments, crop, and perspective correction.
05. Custom Reset Preset
When I start editing a new image, my first step is to always make sure that all the vertical lines are vertical and that all the horizontal lines are horizontal.
I use the Crop Overlay tool to make the horizontal lines straight. I adjust the vertical distortions using the Transform Panel tools.
Next, I try to improve the composition by cropping the photo differently or by using a different aspect ratio. I use the Crop Overlay to do this.
Once I am happy with the image ratio, I edit the image using the Develop Module tools.
If during my editing workflow I am not happy with the results and want to start over, I cannot use the Reset Button because this will reset everything, including the composition and perspective adjustments.
Related: Exposure X5 Review – True Lightroom Alternative?
For this purpose, I created the RESET ALL develop preset to reset everything except the crop and perspective edits.
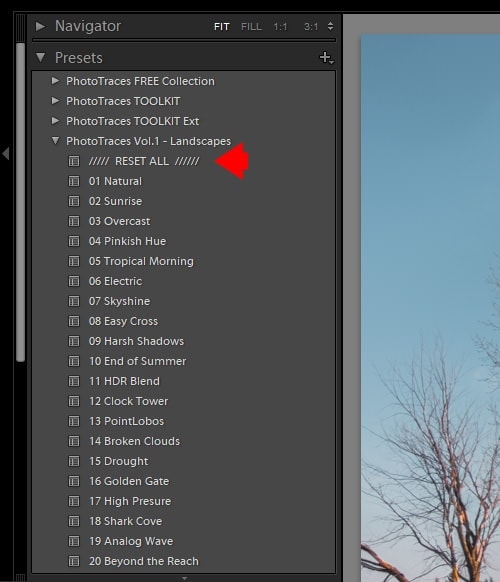
You can find the RESET ALL preset in my preset collections, including the free collection.
06. Before / After
Finally, we have the Before and After command. By hitting the shortcut key “/” once, you can jump directly to the first step in the History Panel. By hitting the same shortcut a second time, you can jump back to the latest step.
See also: How to Flip and Rotate Image in Lightroom
I use the Before / After command often during the editing process since it allows me to see my progress.
Conclusion
As you can see, Lightroom has plenty of options to choose from for even such a simple function like “undo.” Also, understanding how the different options work will make your editing workflow faster and more streamlined.


