Understanding how to whiten teeth in Lightroom is essential to produce natural-looking portraits.
When you shoot portraits outside a controlled studio environment, you can rarely achieve bright and color-cast-free teeth straight out of the camera.
In most cases, the teeth get shaded by the lips and, as a result, get underexposed. Instead of bright white, they look greyish.
Second, the environment produces a color cast that makes teeth look unnatural. For example, a sunset creates an orange/yellow color cast, a bright open sky produces a blue color cast, and mixed lighting indoors can produce different color anomalies.
It means that even if your model has perfect white teeth without any stains, you still need to touch them up in Lightroom during post-processing.
The goal of teeth editing in Lightroom is to brighten the teeth and remove any unnatural color cast. Luckily, this is very easy to do.
Table of Contents
How to Whiten Teeth in Lightroom
Adobe released a major update to Lightroom in October 2021, which caused a shift in the way teeth whitening is done. The Brush Adjustment tool, which you could previously use for teeth whitening, was renamed to Brush tool and moved to the Masking module.
This tutorial will teach you how to whiten teeth in Lightroom using the new brush tool to incorporate it into your workflow.
You just have to follow these next steps:
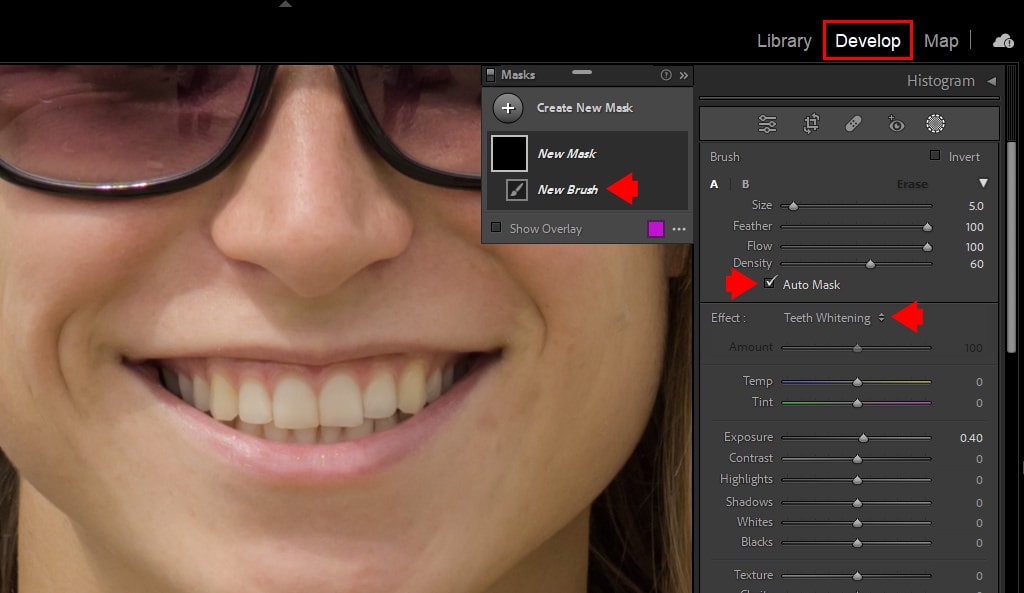
1. Create New Brush Mask
- First, you must open an image in Lightroom.
- In the Develop module, click on the Masking Icon. This is situated in the top right bar, which looks like a circle with a dotted outline.

- You’ll notice that you have many masking options available. For this particular edit, you have to choose the Brush Icon: Click on “Brush” – there is a brush icon right next to the word

- The Brush Panel will come up. Here, you can see the Masks Panel and a New Mask and New Brush section under it. Below are the sliders you’ll be using.

2. Select the Teeth Whitening Preset From the Effect Menu
- In the Brush panel, go to “Effect” (under the “Brush” area)
- Click on the drop-down arrow and look for the effect’s name (Teeth Whitening) from the list. Select it.

You’ll notice that Saturation and Exposure are now set to values appropriate for teeth whitening. This preset affects only two parameters: Exposure +0.40 and Saturation -60
3. Select the Auto Mask Option
Before going further and applying the effect, there is another crucial step you mustn’t forget under any circumstance. Check the Auto Mask box. You’ll see it under the Brush adjustments box.

What does Auto Mask do? Essentially, it helps your Brush stay within the lines when painting. That’s because masking happens only if the color and contrast are similar. If there’s a difference between these two, the masking won’t work – that is, you won’t be able to apply it.
So if your hands are shaky, you don’t ever have to worry about going over the line.
4. Zoom in on the Area of the Teeth
You have to ensure you get maximum precision and detail. This is just an extra step, albeit one that makes a huge difference. The final edit should look as natural as possible.
To Zoom in on the teeth:
- Press down the Spacebar and hold it down
- Click in the area of the moth
5. Adjust Brush Size
In the Develop module Brush section, go to the Brush box where your brush adjustments sliders are, and go to the “Size” slider. Play with it until you reach the desired size.

Alternatively, you can use:
- the shortcuts “[“ and “]” to increase or reduce the size of the Brush
- the mouse wheel to change the size accordingly
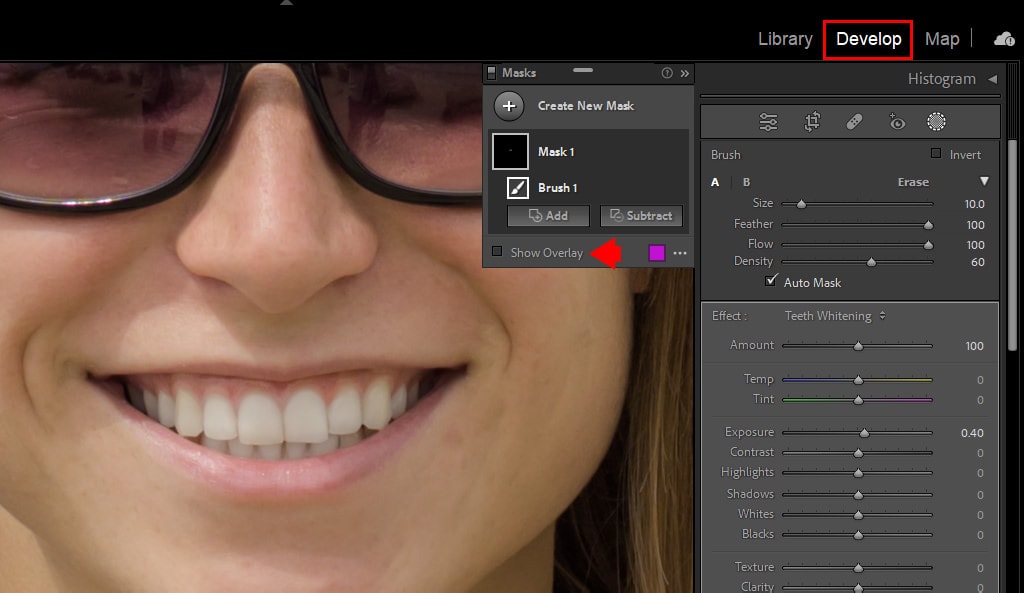
6. Activate Mask Overlay
Typically, Mask Overlay is activated from the start. But if that’s not the case, you can do it by following these steps:
- Head to the Mask Panel
- Make sure the box next to Show Overlay is ticked – if not, check it yourself.

Alternatively, an easier way to activate mask overlay is simply by using the shortcut “O” on your keyboard.
*Note: You can also choose your overlay mode – these modes highlight the affected areas and can be any color or opacity you want. To do this, simply click on the ellipsis image next to “Show Overlay” and check your preference from the dropdown menu.

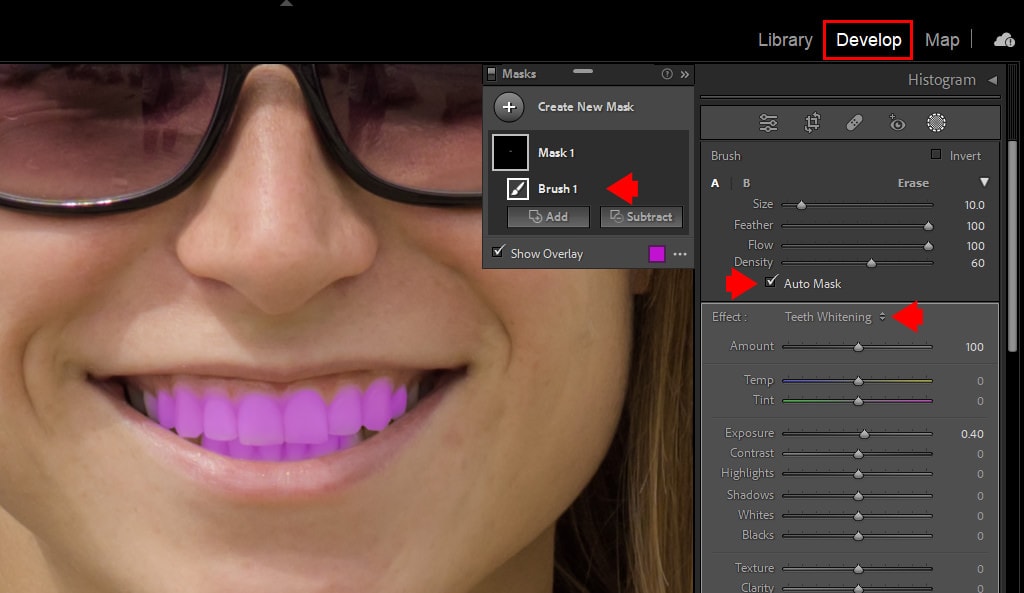
7. Start Painting Over the Teeth
The last step is actually painting over the teeth.
Drag the Brush along the areas that you want to be whitened. Take your time – the more you pay attention, the fewer adjustments you’ll have to make later on. The Mask Overlay will indicate the affected areas.
Now that we’ve got our teeth covered (literally) let’s look at how to ensure the mask is making a difference. To do this, uncheck Show Overlay in the Masks panel (shortcut “O”) – to see the actual changes.
Now let’s look at what we can do if our mask isn’t accurate enough. Let’s say it has too much coverage above the lip—if that happens, then you have a couple of options:
Undo the last retouch:
- Use the keyboard shortcut “Control + Z” for WINDOWS or “Command + Z” for Mac.
- Go to the top bar -> Click on “Edit,” -> click on “Undo.”
Delete Brush:
- Right-click the brush image -> From the menu, go and click on Delete “Brush 1”
8. Refine the Mask
If that means removing any adjustments you made outside of the area you wanted to affect, you have to subtract from the selection by turning the Brush tool into the Eraser brush. Just follow these steps:
Head back to the Masks panel > select Subtract > Brush. Then set up your brush settings as follows:
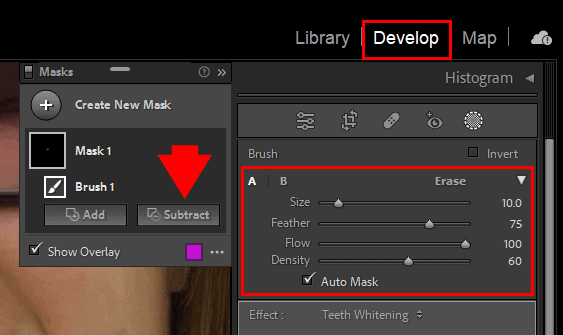
- Make sure your Brush’s size is just right – if not, you can always adjust accordingly.
- You should ideally set density and Flow to 100
- Feathering should be high – 75+ is a good number.
Afterward, simply go to the image and pick the areas you want to subtract from.
9. Change the Strength of the Editing Effect
- You can make one more additional change to your effect, and that is changing the strength of the effect of teeth whitening.

10. Final Result
When you disable the Brush Mask, you can preview before & after effects.
As you can see, I managed to brighten the teeth and remove the yellow color cast.

How to Whiten Teeth in Lightroom | Conclusion
That’s it. All the steps are boiled down to a straightforward process. Have your photos ready and follow the steps above, and you’ll be able to whiten anyone’s teeth in Lightroom quickly and beautifully. Make sure the final edit doesn’t look artificial and unrealistic, so play with those sliders at your own risk!
And don’t forget to smile!


