This post was inspired by one of my readers from Europe. Felix recently switched from Aperture to Lightroom and now he is struggling to find the right Lightroom organization for his photos.
My initial reply to Felix was that all of us, meaning all Lightroom users, struggled at one time or another with the organizational system and that there is, unfortunately, no perfect solution. We are all trying to find a system that fits our personal needs.
Today, I want to share my own system and show you how it has evolved over the years.
You will learn:
- How I organize photo files on my hard drive
- What tasks I perform when importing photos into Lightroom
- How I select the best photos for processing and archiving
Challenges of Lightroom Organization
I believe the main issue with Lightroom is that it has so many options for organizing photos and, as a result, multiple options bring unnecessary complexity.
Lightroom has the following organizational features:
Quick Collection, Flagging, Starring, Color Tagging, Collections, Smart Collections.
When I started with Lightroom, I tried to use all of them to come up with an elaborate system that was impossible to sustain for long. Every time I failed with one system, I would come up with an even more complex scheme. And, at some point, I realized that it was time to simplify the entire process.
Related: Top Free Lightroom Tutorials for Beginners
I decided to check what type of systems other photographers employed. That’s when I discovered a completely minimalistic system used by some wedding and event photographers.
At the end of the event, even photographers import a few thousand photos into Lightroom and go through them one or two times and FLAG only photos with potential (keepers). They end up with 200-300 or so keepers and then delete the rest without hesitation. Fast and efficient.
Even though I liked that approach, I knew it would not work for me without tweaking it as very often I like to go through my old rejected photos, the ones I never processed or published, and try to find missed golden nuggets.
I have noticed that when you grow as a photographer, you start to look at certain aspects of photography differently, plus you learn new approaches to process photos and, very often it results in reviving some rejected, old shots.
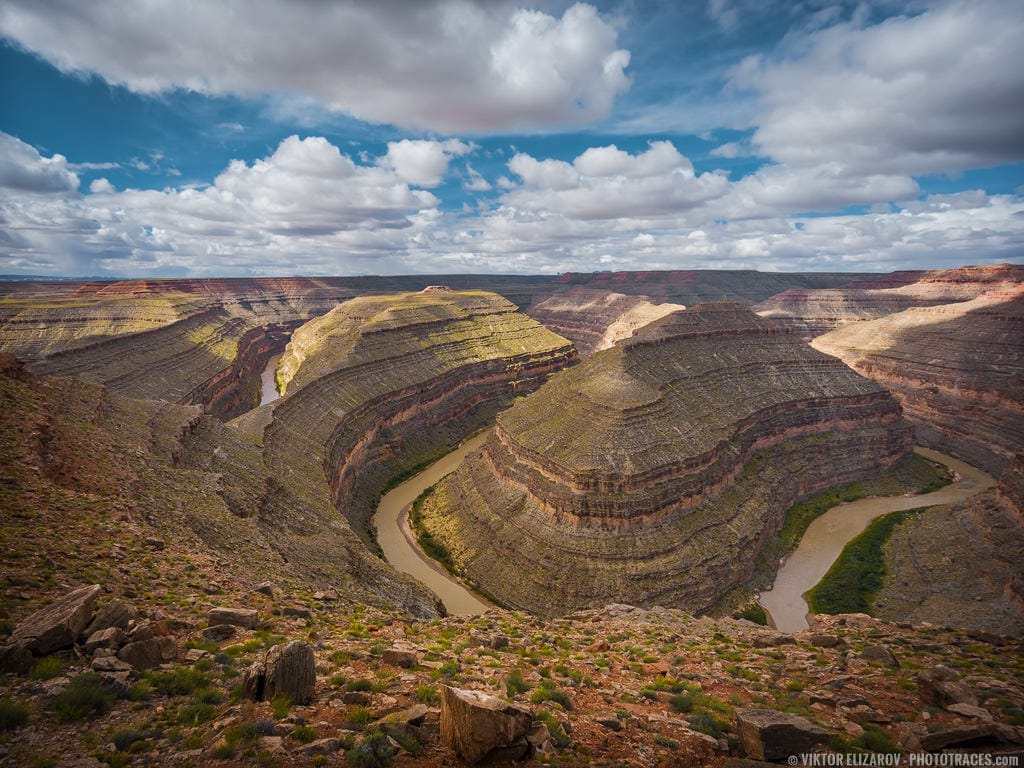
Below are two examples of very old and rejected photos I discovered in my Lightroom archives and processed recently.


I used a minimalistic approach; I learned from event photographers, as the base for my own system and built upon it.
My organizational system has 3 main components:
- Files structure on a hard drive
- Renaming and tagging during import
- Collection-based approach for selecting, processing and archiving photos
Lightroom Folder Structure
When you import photos into a Lightroom catalog, the Lightroom does not organize the files for you. You can keep them anywhere you want on your computer or even on an external drive. Although it gives us full control over file structure, sometimes it can cause problems when you keep your photos in different places on your computer.
Please note, when you rename a single file or move the entire folder to another location and you do it from outside of Lightroom (using Finder or Explorer for example), Lightroom has no means of tracking the changes and those files will likely be lost.
If you need to rename or move your photos, do it from inside of Lightroom.
In order to prevent accidental removal of the files from a Lightroom catalog, I keep photos in one location and make sure that I never move them around or rename them outside of Lightroom.
I keep all my photos on the same hard
drive
I keep all my photos in one master directory
Below is the schematic view of the folder’s structure of my photos. This is exactly how my photos are organized on my computer’s hard drive.
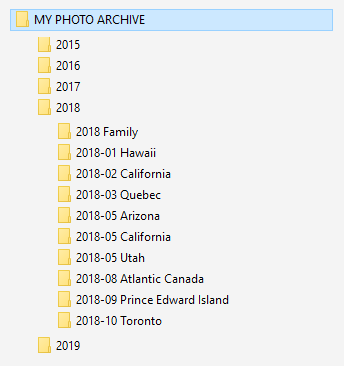
The file structure I use is 3 levels deep. I organize photos by year and by project or location. I love this chronological organization as this is the best organization for my workflow.
Because I am a travel photographer and my trips usually last longer than one day, I use location based naming convention without specific dates (month only).
Related: My Top 15 Adobe Lightroom Workflow Tips
Depending on your workflow you can tailor folder naming for your specific needs. For example, you can make it project based and date specific: 2015-10-29 Photoshoot Name.
Importing Photos into Lightroom
Before I move any further, I want to stress that I do not use multiple Lightroom catalogs. I have only one catalog for all my photo activities. I know that some photographers use multiple catalogs to separate their personal and professional photography but it never worked for me. I tried managing multiple catalogs when I started with Lightroom a long time ago and it was a nightmare. I quickly switched to a single catalog workflow and never looked back.
When I am back from a trip and have thousands of photos to import, I perform the following routine:
- I create a folder (destination) for new photos (see previous section)
- I rename all photos based on a custom template
- I do top level tagging
Destination
I create a new folder with the date and the name of my trip or the project name (for example, 2018-05 California) and set it as a destination for the import (see below).
You can create new folder from Lightroom or you can use Explorer (PC) or Finder (Mac) and create new folder through the file system. I prefer the later. I find it to be faster.
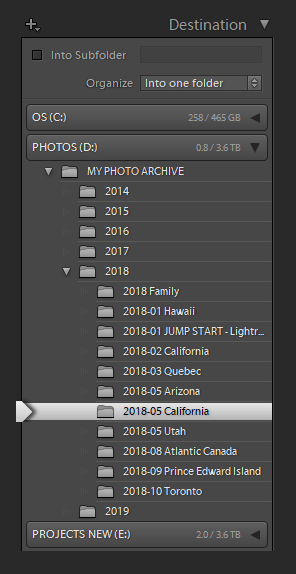
I do not use subfolders inside of the main directory 2018-05 California, I import all photos into one folder.
Renaming
There are many ways to batch rename photos during the import. I use a rename template approach. I created a custom template (preset) and use it with every import.
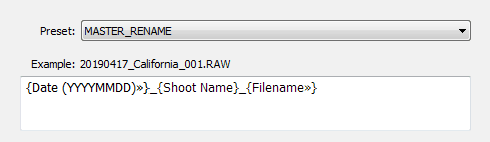
The Date and File Name are set automatically by Lightroom, but for the Shoot Name I have to set a custom value, otherwise, Lightroom will set a default value as UNTITLED SHOOT.
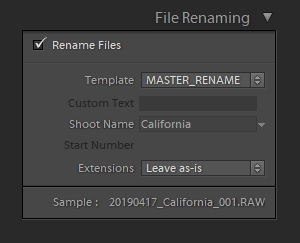
After renaming, all my photos have the following naming structure:
20190417_California_DSF0211.RAW, 20190417_California_DSF0211.RAW …
Now, if I come across a photo file on my computer I can tell exactly when and where it was taken without opening it or checking the meta data.
Top Level Tagging
During initial import, I apply some tagging based on location or type of photos. For example, I might apply very generic tags like “USA“, “California“, “Summer” and, if it was a
Collections Based Organization System
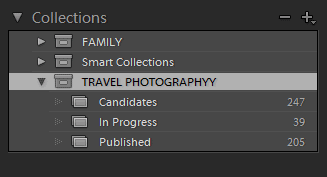
My organizational system inside Lightroom is collections based. I created the following structure inside of the Collections Panel which helps me organize newly imported photos.
Identifying Bad Shots
My first goal, after I import new photos to Lightroom, is to remove all bad shots, the ones that can never be used. For example: out of focus photos.
I quickly go through all my photos and use the keyboard shortcut, “X,” to flag all rejected shots. The process goes very fast even if I have thousands of photos because I concentrate on one task only.
After I finish, I delete the rejected files immediately so they do not go to my backup system.
Identifying “Keepers”
The next step is my favorite. I go through the photos again and, with the help of the shortcut, “P,” (P is for PICKED) I flag all photos which have the potential to be processed and published (keepers). Once again, I only concentrate on one single task. I am not trying to grade picked photos or set star value.
When I am done, I select all flagged (picked) photos and drag them to the CANDIDATES collection inside of the TRAVEL PHOTOGRAPHY collection set (see image above).
Please note, when you add photos to Collections you do not actually move the original files, you only create a reference (shortcut) for easier organization.
Now, when I need photos to publish on my blog, I go to the CANDIDATES collection and pick 3-4 photos I like and drag them to the IN PROCESS collection and remove them from the CANDIDATES collection at the same time.
In order to speed up the process of editing photos in Lightroom, I use Lightroom Rapid Editing. I use my Preset Collections to apply a variety of looks and styles to my photos and see which look I like and what direction I want to take. If you are interested in exploring Lightroom Rapid Editing, check my Introduction to Lightroom Rapid Editing tutorial.

The photo can stay in the IN PROGRESS collection for anywhere from a couple of hours to up to few months, depending on how fast I can process them. Sometimes I start editing one photo but get bored with it and move to another so processing time can vary.
When I finish with processing and I have a final JPEG image uploaded to my SmugMug portfolio for image hosting and safekeeping, I move the original photo file from the IN PROGRESS to the PUBLISHED collection. This way I have easy access to all source files of my published photos.
In the future, I have an option to go to the folder 2018-05 California to where I originally imported the photos, filter all unflagged images and see if I missed anything interesting.
I use the same workflow for my family photos. I have dedicated the FAMILY collection with an identical collections structure inside.
I always try to improve my organizational system and if you have a suggestion or you want to share your own system, please leave a comment below.